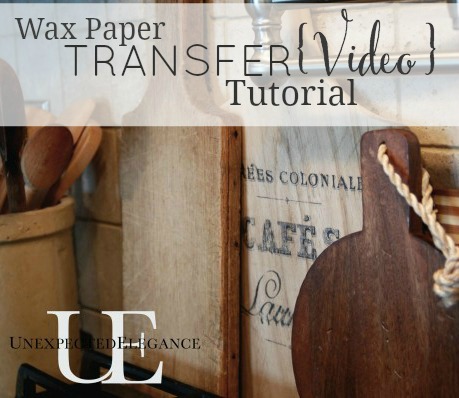
Today is a pretty big day! 😉 I FINALLY have a video to go with my Wax Paper Transfer tutorial!! You would think after all these years, I would have made one sooner, right? So if you’ve ever wondered if this method REALLY works or had questions, hopefully this video post will answer them.
I often get asked about how to reverse an image…I mentioned it briefly in the video but I thought I would address it a little more.
If you use an editing software, it probably has a built in option to flip the image. For the rest of you, this is the EASIEST way I know how to do it… regardless of if you have a Mac or PC.
Start by going to PicMonkey.com and click on the Edit picture, then choose an image.

Click on the Rotate tab on the right side of the screen.
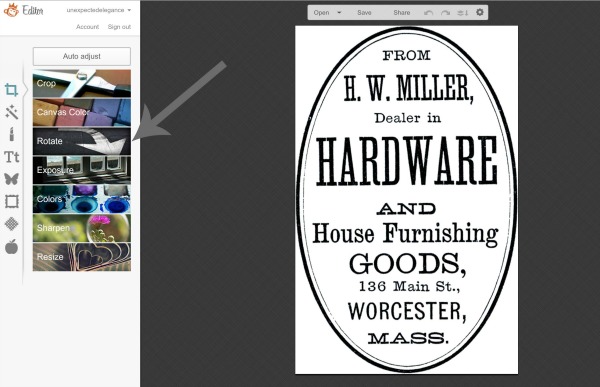
Then click on the horizontal arrows and hit apply.
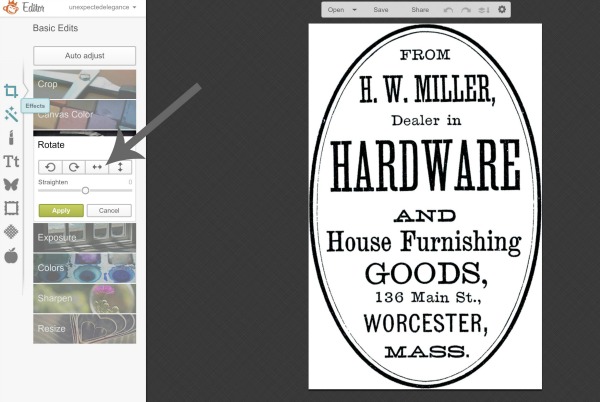
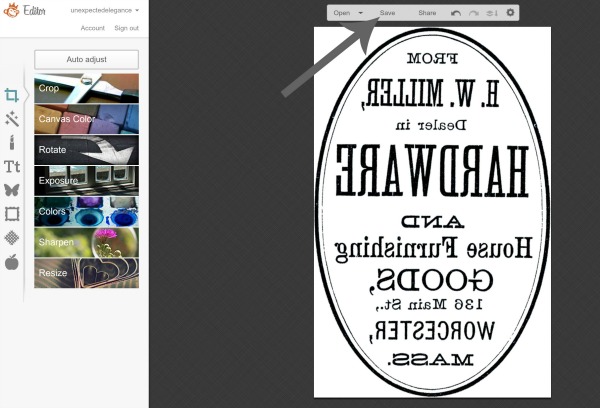
Save the image and you are ready to start the transferring process!!
Sara from sincerely, sara d. helped me make this video so be sure to stop by her blog and say HI! If you have any suggestions for upcoming videos, please leave them in the comments section.

For more information on how to seal the image, check out this post: HERE.


Can you poly urethane over the wax image? Then put liquid glass on that?
Kayla, I’m assuming that would work. I would use a few coats of light spray first so the image doesn’t run. 🙂
I tried to do this and two things happened. One: I couldn’t figure out how to turn my picture backwards so it looked correct. By the way, I used a picture from my computer that I took by camera. Two: the waxed paper got caught up in the printer, so I had to take my printer apart to get the waxed paper out. Have any tips on how to print this thing?
Never mind, I got it the second time. Thanks.
Awesome!! 🙂
there is also an option when printing to flip the image there. does it matter which side of the wax paper you use?
Both sides should work fine. I don’t ever worry about what side I print on. 🙂
Hi Angela, each time I’ve tried the wax printing, it gets stuck. I’ve tried two different printers. Any suggestions?
If you have a pack of Avery labels, I would try removing them and printing on the backing. It’s got a waxy feel and works just like wax paper. 🙂
Take painting tape, put small strip at end going into printer for it to grab onto, it will go in easy.
Brilliant! thank you for sharing this!
I am having the same problem as the other ladies…the wax paper gets jammed in the printer.
Theresa, try using a used label page or even freezer paper. The shiny side of the freezer paper works too and it’s a little more rigid.
Could I do this and iron onto fabric?
Georgia, it will work on fabric but it’s a little more tricky. I would try it out on a scrap piece first. It doesn’t wash well so if it’s something that will need to be washed you might want to try a different method. 🙂
I was just wondering what type of glue you use do put on the wood before you put the picture on it
For those that say the wax paper gets struck in your printer. The wax paper is getting hung on the rollers of the printer. My printer front loads the paper, whereas in the video the printer was a top load and she lifted up the roller to in sure the wax paper was underneath the roller. I have attached wax paper to a plain sheet of printer paper and had great results. Just put an inch size piece of scotch tape onto one end of the wax paper folding over the tape onto the paper on the back, the taped end is what you will feed into your printer. After it is printed let set, as said in the video, then remove the plain piece of paper. The trick to this is to feed the combined piece into the printer so it prints on the wax paper and not the plain paper. If you are unsure of which way to feed the paper combo, take a plain sheet of paper write plain on one size and wax on the other, print out a small text of your choice and then make a note on this piece of paper as to how the paper was fed into the printer. ie: face up, or face down Hope this helps!!
Thanks for sharing that, Rhoni!! 🙂
would it work just aswell on fabric if i iron it on?
Kandola,
I have used it on fabric but it is a little tricky and doesn’t wash well. It works best on heavier, tight knit fabrics too. 🙂
Not sure what I’m doing wrong, but I haven’t been able to get it to transfer to wood or anything else! And yes, I’m using an ink jet printer…with name brand and off brand wax paper. Is there a time limit from when it prints to how quickly I apply? Thanks.
Will this work on other materials, like canvas, mirror, glass or ceramic? Tia
Tia, it will probably work on canvas but I’m not sure about the rest. It works best on porous surfaces.
I do fabric painting and found a design I would like to put on my on fabric. It is black and white graphics so I can “paint” any colors I want. I do not care if the “lines” go away. Can I use this method and have the paints work? Will this leave a waxy film that the paints will not work with?
Beth, it shouldn’t leave a waxy film. It works on tightly weaved fabrics but I’m not sure how it will work with paint. My suggestion would be to try it on a scrap piece of fabric first. 🙂
What an incredible video! It is so helpful and so well done. Thank you so much!
what type of printer do you use?
It’s a super cheap HP InkJet printer. I think it was around $35. It has a top load for the paper. Hope that helps! 🙂
thank you!
Cool tutorial. I’ve done transfers wth printer paper and it is much more time consuming and not as rewarding. I will have to try this. The only thing is, you said it works with ink jet printers and I have a laser jet printer. Do you think it will still work?
Amanda, I don’t think it will work with a laser but I’m not a 100% sure.
Hello, your video tutorial on image transferring using just wax paper and inkjet is very interesting. I would like ask whether you have tried transferring the image using the same technique that you used here on a PCB or Printed Circuit Boards for etching electronic circuits. Many years ago, some retail store sell letter-transfers for PCBs but instead of letters, the images were in the form of electronic lines and circles, and also use your same technique, such as using the credit card to press the image to remove from the wax paper and stick on the wood. Do you think this will work?
Mark,
I’m sorry but I don’t have any experience with using this transfer method on circuits.
Will this work for photos or just simple images?
Karen, it depends on the photo. Generally if there is too much detail it won’t work as well.
Your tutorial is lovely and I would like to use it to transfer some nautical black logos on a thermal plastic mug. Does it work on plastic as well?
Honestly, I haven’t tried it on plastic. It works best on a porous surface, so it probably depends on the type of plastic. Sorry, I’m not much help with this one! 🙁
Hi! Thanks for your tutorial. I have a board that I want to paint a color and then transfer the image onto it using the wax paper method. Will it still transfer with no problems? Thanks again and keep up the good work!
Melissa, it should work fine on a painted surface. Good luck with your project!
Thank you The vídeo i Love it!!! Now in just sonde ring if this would work on a canvas? Not sure if anyone has tried it?
Hi. Does this work to transfer an image to paper?
This video’s constant interruptions by ads was so irritating I didn’t even finish it.
You say to use an ink jet printer will a laser printer that uses a dry toner work? Hate to buy a new printer just for this, but I could.
I’m really not sure? Sorry!
Quisiera saber como leerlo en castellano, esta buenisima la idea pero no la puedo realizar
Could the wax paper transfer be also used on canvas?
What kind of printer/Ink works with this method?
Could this method work with aluminum metal sheets??
It might work if you sand it a little, but I’m not sure. Sorry!
Will this work on stained wood?
Yes, as long as the wood is still somewhat porous.
Please tell me the site you get your images. Thank you. Cristina
It is a site called Graphics Fairy. Here’s the link:https://thegraphicsfairy.com/
Hi I used this method on chalk painted surfaced it looked great but didn’t set, it just smudge ? Didn’t work have u got any suggestions using it on painted thanks
Did you use a wax sealer on the chalk paint? That might be the culprit?
¡Hola, Angela!
Me encantaría hacer eso que hiciste, pero en mi localidad no existe ese tipo de papel… Sabes si se puede hacer con otro tipo de papel?
De antemano gracias!
Saludos desde CDMX.
El Wax o el Freezer papel lo puedes compral en eBay.com tambien. Perdona que el Español mio no es tan bueno.
Saludos de New York,
Liz
Hi Angela, Thank you so much for your video, it was really informative. I have seen other videos, they used freezer paper but they really did not show the process, which was so helpful on your video nor did they give any suggestions as to what site one can go to for graphics to transfer images, which is so helpful.
Thanks again!
Liz
I have an HP all in one printer. I tried printing on was paper. It came out smeared. What did I do wrong?
I’m sorry it’s hard to say what the problem might be. If it came out of the printer smeared, it might be that your rollers have some lint on them? Just guessing!
Hello,
Thank you for the tip. It is beneficial in making my Christmas gift for my church family. May I asked, what seal can I use so the print won’t smear when sealing the wood?
Thank you!
Hi can u tranfair on to glass useing this technique?
Cheers
It won’t do well on slick glass.
Great work!
You said something about a place to get some images. Something lik “graphics …. .com. Would you please tell me the name. I don’t get it
Thank you
Fabulous video. This is years later, hoping you are still followong. Question: Will this transfer work on a piece of wood that is coveredwith acrylic paint? Thx!
Hi! Your video has made the project I’m working on so much easier. Thank you so much!?? I’m assuming the transfer will work even if not done the same day as the printing?
It’s been several years since this post. I hope you get this lol. I was wondering if you can put it on glass?
WAY TOO MANY ADVERTS!! Makes your website unreadable…
I love reading articles about 먹튀검증사이트 . Read this article for stylish, useful and innovative ideas that will make your life easier. Thanks for writing such a great article.
This information is very helpful, thank you very much for sharing it in this post. Greetings from our review of FaucetPay wallet
I often work with photographs and sometimes it is very difficult to find the ones I need. But the site helps me, where there is a lot of interesting things. Thanks to him, my works will turn out bright and interesting and are in great demand.
Regularly writing blogs is a habit of mine, and I must admit, your content is truly remarkable.
Well, if you are going to just flip one image a month, you can get away with this tutorial. I supervise the whole fashion department, we use custom-developed software that was made for us by a professional software development team. You can read more details here. The difference is that this software has an embedded AI tool that helps to do bulk image flipping. At the industrial scale it saves week of work! Can you imagine how much money I saved?