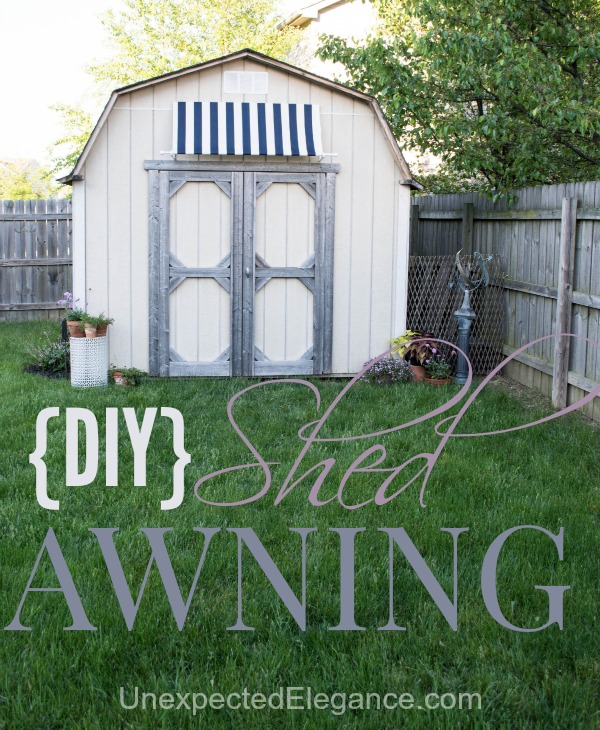
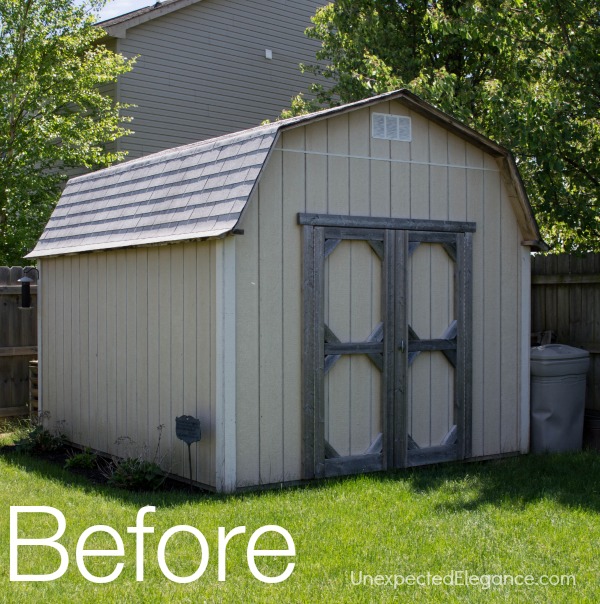
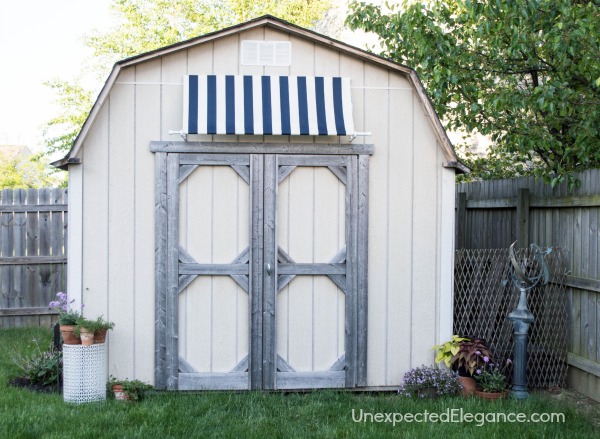
The previous homeowners of our current house had a shed built right before they put the house on the market. It’s wonderful having the extra storage but it’s not the prettiest feature of our backyard.
I have tried a few things over the years to make it a little “cuter” but nothing has really worked. I put a flower bed beside it, but we are having trouble getting the hydrangeas I planted to grow large enough to make any kind of a difference. (I’ll be reworking that area this summer and moving some plants around!)
Last year I added the little “fence” to try and hide some of the junk I have along the side and it’s made it a little better. The small fence is removable so it’s easy to take down for the winter.
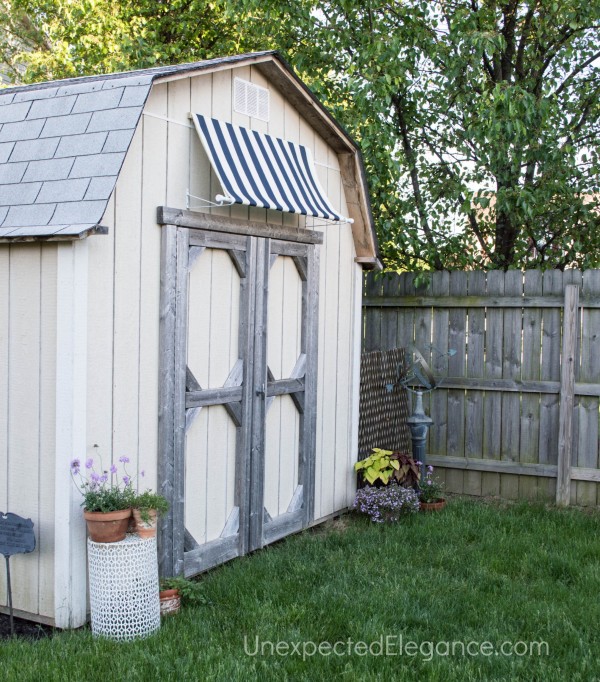
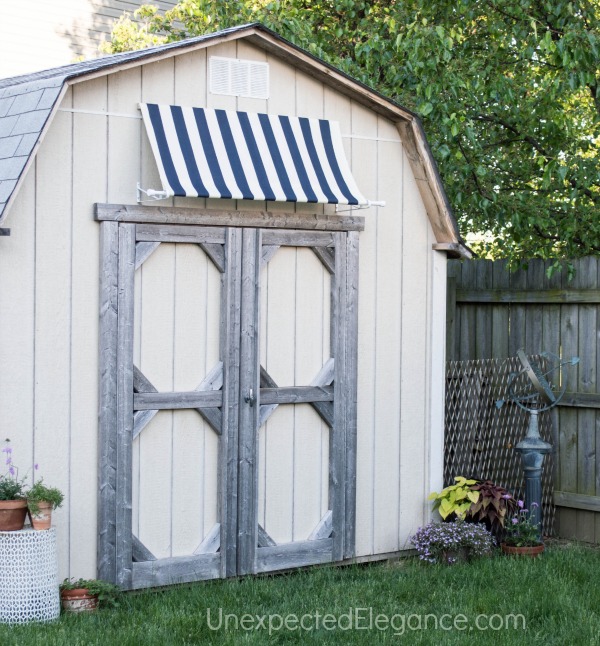
I wanted to add some color but I can’t paint the shed and stay within our homeowner’s association rules…so the solution I came up with was to add an awning. This version is inexpensive, customizable and can be removed easily.
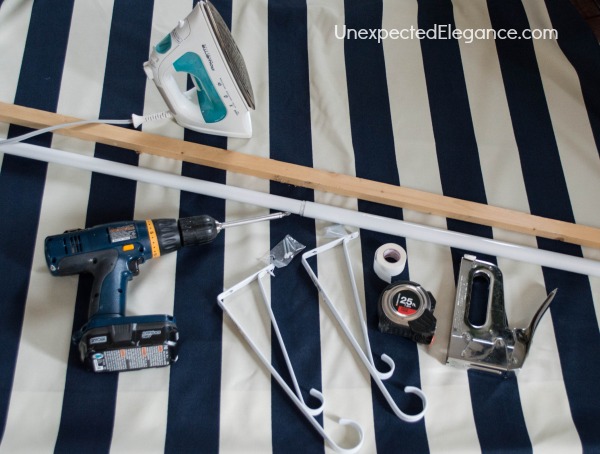
Supplies:
- outdoor fabric
- Heat’n Bond Hem Iron-On Adhesive
- iron
- two plant hanging brackets
- adjustable curtain rod (or shower curtain rod)
- scrap piece of wood the width of the fabric
- 2-3″ outdoor wood screws
- drill
- staple gun
- tape measure
DIY Shed Awning Tutorial
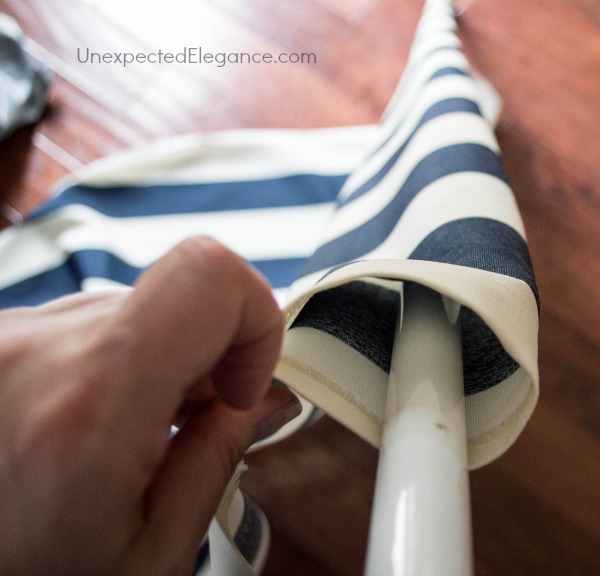
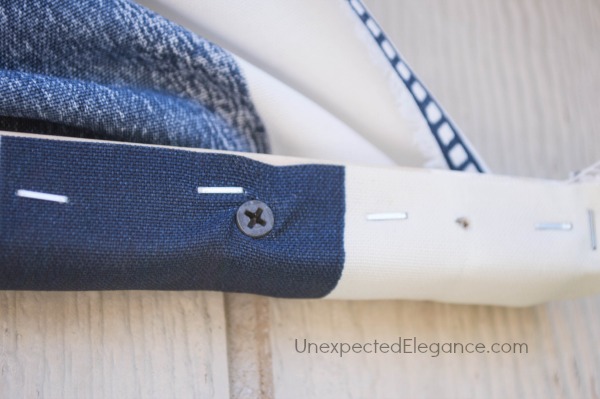
Start by making a pocket at one end of the fabric. I used the Heat’n Bond and it was quick and easy.
Use a tape measure to ensure that the pocket is even. See the photo below for how it should look.
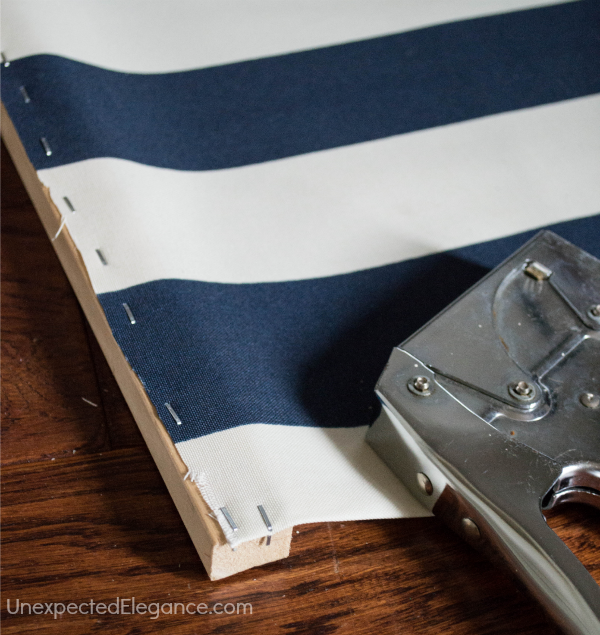
Measure how long you need the overhang of the awning to be, then add the width of the scrap wood. My awning needed to be 23″ so I laid the wood at 23″ then marked the fabric at a little over 24″.
This measurement is going away from the pocket. Cut a straight line down the fabric at your mark (horizonally).

Once your fabric is trimmed, stapled it face up onto the scrap of wood.
You want to try to get the fabric as straight as possible when you are stapling, so your finished product is not uneven.
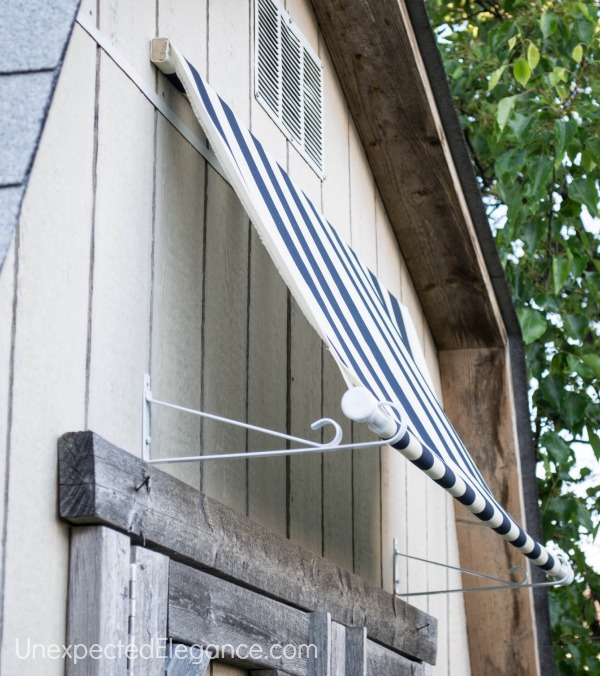
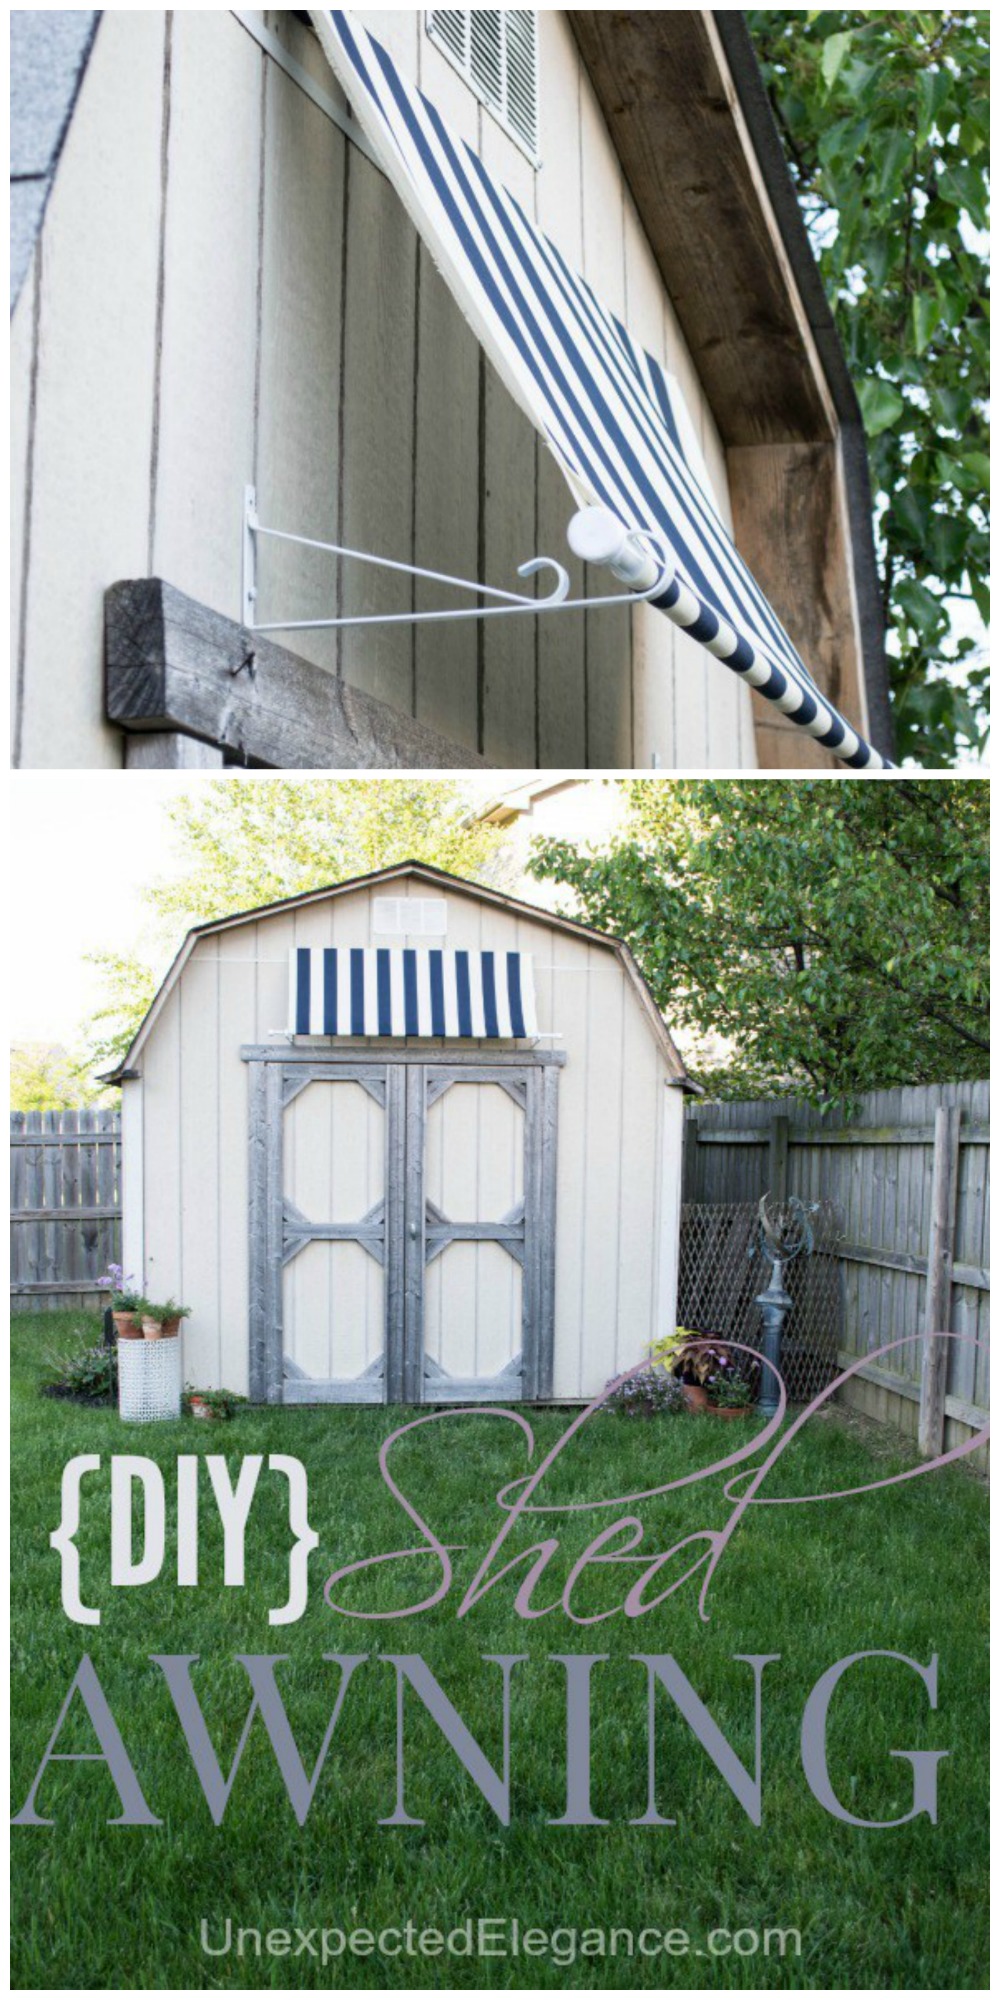
To hang the “awning,” measure and use a level to figure out the top placement. Then screw the stapled board into the shed like the picture below. Flipping the wood over will keep the fabric secure and will give you a more finished look.
Add the rod to the pocket you made on the end and attach it to one of the plant hanging brackets to figure out the placement.
The bracket will need to be upside down. See the photo below.
You want the fabric to be taunt. Mark where the bracket needs to go and secure with screws. Repeat this step on the second bracket.
And you’re done!!
This was a very easy project and took about an hour to complete. I did this by myself, but having a second set of hands to hang it would have made it easier.
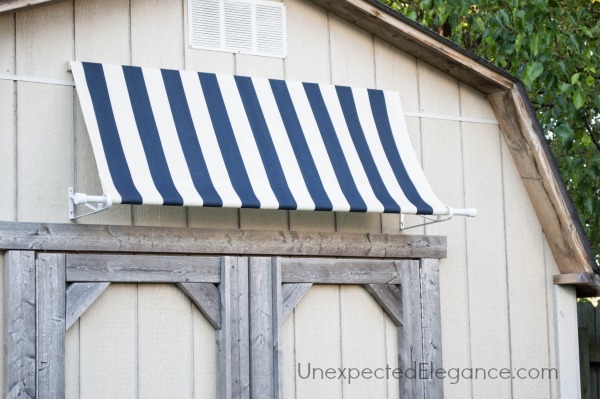
This was a very inexpensive project and completely changed the look of our shed. I think the wood around the doors might get a coat of white paint, now!
So what do you think of my DIY shed awning? I regret not making it a little wider, but it serves it purpose!

Do you think the Heat and Bond will hold up to the elements?
It works great with washing. I have had it up for a few months now and it seems to be holding up fine.
Not crazy about it. Think it needs to be wider. Just my two cents.
I agree, needs to be wider.
I agree, needs to be the width of the door.
I will up you 2 cents as I agree 100%
I love this idea! I think the feature I might add is a ruffle valence at the bottom. I am thinking of doing this on my hen house. I love it!!! Great job!
Oh it would be so cute on a hen house!! I’d love to see pictures of the finished project!
i think I’m going to copy this on the front of a playhouse. Where did you get the plant hanging brackets? Are the plant hanging brackets actually holding the shower curtain rod? Does it snap into that curve? I may use pvc for the bottom. Or is the shower rod just resting on the brackets? Thank you
The brackets are just inexpensive ones from the hardware store. You could definitly use a piece of pvc! The rod is held on by the hook part of the hanger and the tention. Hope that helps. 🙂
Hi Angela
Thanks for your pictures.
It is a good idea to attempt to beautify such an ugly duckling, (no offence) after all you have to live with it. The proportions of the shed are ok, but the timber surrounds are way too heavy looking. Your idea to paint them white is definitely the way to go. That will reduce their impact considerably, even better, match them completely to the shed colour.
Your blind would look better if it was much bigger.
Take a picture of the shed and draw on your material across the width of the shed, like you have done but all the way across and make it a bit longer so it hides the top of the door frame. You can also paint that bit of the underside of the roof white. That will pick up the white in your blind.
A three feet flower bed along the side, a little flat area in front (pebbles or gravel) a fold up chair covered with your awning fabric and you will be set for next Summer.
All the best, hope your winter is not to severe.
Margaret
Margaret,
Thanks so much for the suggestions!!!
I like the idea, but I think it needs to be wider and lower. Looks very small above those two big doors, and way too high.
Very creative and just what I was looking for. A small, ready made awning can cost anywhere from three to four hundred dollars, not what I was willing to spend on a shed window. Thank you.
Love your idea! I need an awning on east side of house until trees are bigger. I am going to try this. Thank you!!t
Love this! Yes it looks too high but the doors open out. So I can see why it needed to be installed this way. Cute and functional. Thank you for the perfect inexpensive solution.
I am going to do this for my motorhome windows. ( A stationary MH) It will help keep the water from running down the windows when it rains.
Hi Angela, I am in the process of purchasing a shed just like yours. I was wondering if you had any issues with the door leaking prior to putting the awning?
Joy, we haven’t any issues with leaks. I added the awning just for the character.
Great job. Love the idea.
Love it, just one suggestion. Flip the brackets over so the hooks face down. If you space them more to clear the doors, you could hang plants from the second hook.
This is such a great idea! Awnings can be so expensive so I’ve delayed getting one for my shed window. This is a simple way to dress up a small window. Thanks for sharing your bright idea with the rest of us!!
Looks like you idea is the simplest and easiest. I want to put awnings on a tiny playhouse I’m restoring for my granddaughter. Awnings over the open window cut outs would be so adorable!
Love this look!! How would you add a hanging valence if desired? And is the heat and bond holding up with the weather?
Thank you!
Great project
Hi Angela! I was looking for awning ideas for my front door bc one side is almost next to the roof. This just might work! Thank you!
I have an idea:) You could make two smaller ones that go under the main one and a little to the side. That would give interest:) I love it anyway tho! I love when we figure out solutions to problems! Have a wonderful day:)
I love it! As long as you like it, don’t worry about what anyone else says. I’ve been looking for something to make to add a shade awning over my daughter’s chalkboard on our wooden fence. This is so simple to make. I’m off to get what I need! Thanks for the idea and inspiration!
Real cute idea! I also added (similar) plant hooks with “good” artificial hanging flowering plants, one on each side of the door. It’s in a spot too sunny to keep real plants growing and looking good, so far from the house for regular watering.
I think it’s simple enough! I’m doing one for my window AC and I used dowel rods and these u screws that have a clip so the dowel won’t come out! But I love the idea of a plant hanger …I might have to try this I have three windows to do! Thank you
No entiendo mucho para qué! No cubre nada, o cuál era el sentido de usar material y tiempo, sólo decorativo? Es algo inútil
I used this same idea on a playhouse my hubby built for our granddaughter. It added so much curb appeal. Thanks for reminding me. I might make some for my windows to shade my new hydrangeas from the hot afternoon sun until they get established. I wonder if I should add a top coat of varnish to the cloth…what do you think?
Lovely idea. I may modify it for a light awning at the front of our house, but using 2×4’s to make it go out further, and adding a vit of an overhang. Maybe scalloped?
I’ve been wanting an awning over the door since we moved in, and a couple yards of fabric won’t break the bank.